Safely remove individual lashes by using an oil-free makeup remover or lash adhesive remover, gently sliding the lashes off your lash line, and cleaning your lash line afterward. Follow additional tips and precautions, such as being patient, maintaining healthy natural lashes, seeking professional help if needed, and storing your lashes properly.

Individual lashes are a popular choice for those who want to enhance their eyes with a natural, customizable look. While these lashes are an excellent option, proper removal is crucial to maintaining the health of your natural lashes and preventing damage. In this article, we will guide you through the process of removing individual lashes safely and effectively.
Prepare Your Supplies
Before you begin the removal process, gather the necessary supplies. You will need:
- Oil-free eye makeup remover or a lash adhesive remover specifically designed for individual lashes
- Cotton swabs or cotton pads
- Tweezers (optional)
- A clean towel or tissue
Step 1: Remove Eye Makeup
Gently remove any eye makeup, such as eyeshadow, eyeliner, and mascara, using oil-free eye makeup remover and a cotton pad. Be careful not to tug or pull on your lashes during this process. It’s essential to use an oil-free makeup remover, as oil can cause the adhesive to break down prematurely.
Step 2: Apply Lash Adhesive Remover
Using a cotton swab or cotton pad, apply a small amount of lash adhesive remover or oil-free makeup remover to the base of the individual lashes. Make sure to saturate the area where the lash adhesive is located. Allow the remover to sit for 30 seconds to 1 minute, giving it time to break down the adhesive.
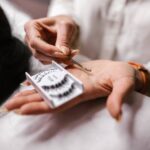
Step 3: Gently Remove Individual Lashes
After the adhesive has softened, use your fingertips or tweezers to gently grasp the individual lash close to the base. With a gentle downward motion, slide the lash away from your natural lash line. Avoid pulling or tugging on your natural lashes, as this can cause damage and even lead to lash loss. If the lash does not slide off easily, apply more adhesive remover and wait for an additional 30 seconds before trying again.
Step 4: Clean Your Lash Line
Once all individual lashes have been removed, use a cotton swab or cotton pad soaked in oil-free makeup remover to gently clean your lash line. This will help remove any remaining adhesive residue.
Step 5: Soothe Your Eyes
After removing your individual lashes and cleaning your lash line, consider applying a gentle, soothing eye cream or a cold compress to your eyelids to minimize any irritation or redness.
| Step | Description |
|---|---|
| Remove Eye Makeup | Gently remove any eye makeup using an oil-free makeup remover and a cotton pad. |
| Apply Lash Adhesive Remover | Apply a lash adhesive remover or oil-free makeup remover to the base of the individual lashes. |
| Gently Remove Individual Lashes | Gently slide the lashes off your lash line without pulling or tugging on your natural lashes. |
| Clean Your Lash Line | Gently clean your lash line with a cotton pad or swab soaked in makeup remover. |
| Soothe Your Eyes | Apply a gentle eye cream or a cold compress to your eyelids to minimize irritation or redness. |
Additional Tips and Precautions
When removing individual lashes, it’s crucial to keep some additional tips and precautions in mind to ensure the health and beauty of your lashes.
Be Patient
Patience is key when removing individual lashes. Rushing through the process can lead to damage or even lash loss. Make sure to give the adhesive remover enough time to work and gently remove the lashes with care.
Maintain Healthy Lashes
Keeping your natural lashes healthy is essential for those who wear individual lashes regularly. Consider using a lash serum or conditioner to nourish and strengthen your natural lashes. Also, take breaks from wearing lash extensions to give your natural lashes time to rest and recover.
Seek Professional Help if Needed
If you’re struggling to remove your individual lashes or if you experience any pain, discomfort, or signs of infection, consult a professional lash technician or a doctor. They can provide guidance and assistance in safely removing the lashes and addressing any concerns you may have.
Store Your Lashes Properly
If you plan to reuse your individual lashes, make sure to clean them thoroughly and store them in a clean, dry container. This will help extend their lifespan and ensure they remain in good condition for future use.
Alternative Adhesive Remover Options
If you don’t have a specific lash adhesive remover or oil-free makeup remover available, you can use an alternative, such as a gentle oil like coconut or baby oil. Apply the oil to a cotton swab or pad and follow the same steps as mentioned earlier to remove your individual lashes. However, keep in mind that using oil-based removers may not be suitable for all skin types, and it’s generally better to use oil-free products when possible.
Avoid Excessive Rubbing
When cleaning your eyes and lash line after removing individual lashes, avoid excessive rubbing or pulling. This can cause irritation and damage to your delicate eye area and natural lashes. Instead, gently clean the area with a cotton pad or swab soaked in makeup remover, using light, sweeping motions.
Conclusion
Removing individual lashes doesn’t have to be a daunting task. By following these steps and using the right products, you can safely and effectively remove your individual lashes while maintaining the health of your natural lashes. Always prioritize proper removal techniques to prevent damage and ensure that your eyes remain healthy and beautiful.
Related posts:
 How to Remove Waterproof Mascara (Step-by-Step)
 How to Curl Lashes with a Spoon (Step-by-Step)
 How To Make Lip Oil At Home? (Step-by-Step)
 How to Make Liquid Blush? Step-by-Step Guide
 How To Apply Powder Blush Over Liquid Foundation? Step-by-Step
 How to Make Mascara? Step-by-Step Guide
 How to Use Mascara? Step-by-Step Guide
 How to Safely Remove Eyelash Glue from Your Eyes and Skin