The process of brow lamination at home involves gathering the right kit, preparing your brows, applying lamination products following best practices, handling any challenges, and ensuring proper post-lamination care. Always consider safety precautions to achieve beautiful, salon-quality brows.
Gathering Your Home Brow Lamination Kit: What You Need
If you’re considering performing brow lamination at home, it’s essential to gather all the necessary products. A typical home brow lamination kit contains:
- Brow Cleansing Solution: This preps the brows by removing oil and dirt.
- Brow Lift Adhesive: This helps in styling the brow hairs.
- Brow Lifting Cream: This softens the hair cuticle, making it pliable.
- Brow Fixing Solution: This resets the hair structure, holding the brows in place.
- Brow Nourishing Oil: This hydrates and conditions the brows after lamination.
“A typical home brow lamination kit includes brow cleansing solution, brow lift adhesive, brow lifting cream, brow fixing solution, and brow nourishing oil.”
| Home Brow Lamination Kit Components | Purpose |
|---|---|
| Brow Cleansing Solution | Cleanses the brows, removing oil and dirt |
| Brow Lift Adhesive | Aids in styling the brow hairs |
| Brow Lifting Cream | Softens the hair cuticle, making it pliable |
| Brow Fixing Solution | Resets the hair structure, holding the brows in place |
| Brow Nourishing Oil | Hydrates and conditions the brows after lamination |
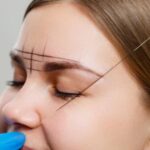
Preparing Your Eyebrows for Home Lamination
Before you start the process of brow lamination, ensure your eyebrows are clean and dry. Here’s how:
- Cleanse: Using the brow cleansing solution, remove any makeup, oil, or dirt from your eyebrows. It’s important to start with clean brows.
- Comb: Use a brow comb or brush to comb your brows in the desired direction.
- Patch Test: Conduct a patch test 24 hours before the treatment to avoid any allergic reaction to the products in the kit.
“Prepare your eyebrows for home lamination by cleansing them, combing them in the desired direction, and conducting a patch test 24 hours before the treatment.”
| Preparation Steps | Explanation |
|---|---|
| Cleanse | Removes makeup, oil, or dirt |
| Comb | Styles your brows in the desired direction |
| Patch Test | Prevents allergic reactions to the products |
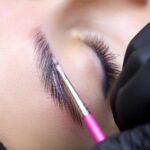
Step-by-Step Guide to Home Brow Lamination
Ready to perform brow lamination at home? Follow these steps:
- Cleanse: Start with clean, oil-free brows. Use the brow cleansing solution included in your kit.
- Apply Adhesive: Apply the brow lift adhesive to your brows, then brush them into your desired shape.
- Apply Lifting Cream: Apply the brow lifting cream and leave it on for the recommended time.
- Apply Fixing Solution: After removing the lifting cream, apply the brow fixing solution.
- Nourish: Finally, apply the brow nourishing oil to hydrate and condition your brows.
“Home brow lamination involves cleansing your brows, applying brow lift adhesive, lifting cream, fixing solution, and finally, nourishing oil.”
| Brow Lamination Steps | Explanation |
|---|---|
| Cleanse | Cleanse your brows to remove oil and dirt |
| Apply Adhesive | Use the adhesive to shape your brows |
| Apply Lifting Cream | The cream makes your brow hairs pliable |
| Apply Fixing Solution | This sets your brows in place |
| Nourish | Use the nourishing oil to hydrate and condition your brows |
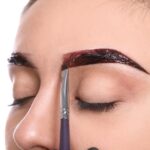
Best Practices for Applying Home Brow Lamination Products
For the best results when doing brow lamination at home, consider the following practices:
- Application: When applying brow lift adhesive, lifting cream, and fixing solution, make sure to apply them evenly across your brows.
- Timing: Leave the products on for the recommended time on the instructions. Overexposure can damage your brows.
- Removal: Remove each product thoroughly before applying the next. Any residue can interfere with the effectiveness of subsequent products.
“When doing brow lamination at home, apply products evenly, follow the recommended time for each product, and ensure thorough removal before moving on to the next product.”
| Best Practice | Explanation |
|---|---|
| Even Application | Ensures all brow hairs are equally treated |
| Timed Exposure | Prevents damage from overexposure |
| Thorough Removal | Ensures effectiveness of subsequent products |
Handling Challenges During Home Brow Lamination
Brow lamination at home might pose a few challenges. Here’s how to handle them:
- Uneven Results: If results are uneven, it’s usually due to uneven application. Make sure to apply products evenly to all brow hairs.
- Irritation: If you experience irritation, rinse immediately and consult a healthcare professional. To avoid irritation, always do a patch test 24 hours in advance.
- Not Seeing Results: If you don’t see desired results, it may be due to not leaving the products on long enough or not applying enough product. Refer to your kit’s instructions.
“Common challenges with home brow lamination include uneven results, skin irritation, and not seeing desired results. Overcome these by ensuring even application, conducting a patch test, and following the kit’s instructions.”
| Challenges | Solutions |
|---|---|
| Uneven Results | Ensure even application of all products |
| Irritation | Always conduct a patch test, rinse off if irritation occurs |
| No Results | Follow your kit’s instructions carefully |
Post-Lamination Care: Preserving Your Results at Home
Once you’ve successfully laminated your brows at home, it’s crucial to maintain them for long-lasting results. Here’s how:
- Avoid Water: Don’t wet your brows for at least 24 hours after the treatment.
- Condition: Apply the nourishing oil daily to condition your brows.
- Gentle Styling: Brush your brows gently to avoid disturbing the shape.
“Preserve your home brow lamination results by avoiding water for 24 hours, conditioning your brows daily, and styling them gently.”
| Post-Lamination Care | Explanation |
|---|---|
| Avoid Water | Prevents disturbance of the shape |
| Condition Daily | Keeps your brows healthy |
| Gentle Styling | Avoids messing up your laminated brows |
These are the key steps to do brow lamination at home safely and effectively. Please remember to always follow the instructions provided with your specific kit and consult with a professional if you’re uncertain about any part of the process.
Safety Considerations for Home Brow Lamination
While brow lamination at home can give you salon-quality results, it’s essential to keep safety in mind to prevent adverse reactions or injury.
- Patch Test: Always conduct a patch test 24 hours before the lamination process to ensure no allergic reaction to the products in your kit.
- Avoid Overexposure: Overexposing your brows to the lifting and fixing solutions can cause damage. Always follow the recommended exposure time.
- Protective Gear: Use the provided protective gear, like the silicone pads or eye patches, to safeguard your skin and eyes.
“Prioritize safety during home brow lamination by conducting a patch test, avoiding product overexposure, and utilizing protective gear.”
| Safety Consideration | Explanation |
|---|---|
| Patch Test | Prevents allergic reactions |
| Avoid Overexposure | Protects your brows from damage |
| Use Protective Gear | Prevents injury to the skin and eyes |
Key Takeaways
- Gathering the right brow lamination kit is the first step towards achieving professional-looking brows at home.
- Preparing your brows and following a step-by-step guide ensures an effective lamination process.
- Following best practices while applying lamination products can significantly improve your results.
- Understanding potential challenges and how to handle them helps ensure a smooth brow lamination process.
- Proper post-lamination care is crucial for maintaining your results.
- Safety considerations, like conducting a patch test and using protective gear, are essential for a safe home brow lamination process.
Conclusion
Brow lamination at home can be a straightforward and rewarding process if done correctly. With the right kit, some patience, and careful adherence to best practices, you can achieve brows that are as beautiful and perfectly styled as any done in a professional salon.